Wednesday, December 28, 2011

Thursday, December 22, 2011
Thrifty Treasures: Great Lash "Lots of Lashes"

So I was on the hunt for new mascaras since it's about that time to chuck my current ones. I picked up my usuals, but then also decided to check out the new mascara out by Great Lash.
See..Great Lash was my very first mascara that I started using in middle school before I knew anything about makeup. I had a clear mascara and my Great Lash..bffs! Fast forward several years and Great Lash put out an 'updated version" Maybelline Great Lash BIG that was a complete FLOP! That 'Big' lash made me look like I had five lashes..it was terrible. So I was skeptical about this new line "Lots of Lashes" but what really pulled me in was the brush applicator. It has a rounded end and a pointed end. Let me tell you! This thang pulls ALLL your lashes. I am highly impressed!
Pros:
-Price point, $4.64 at Walmart. Hands down one of the cheapest drugstore mascaras you will find.
-Dope applicator: Gets into the tight inner corners and fans out the outer lashes nicely.
-Gives nice volume!
-Nice rich color. I got the Brownish Black one and it was perfect.
-No funky smell to it.
-Cute packaging (as always from Great Lash)
Cons:
-Fast dry formula: Be sure to apply two coats on one eye at a time. I made the mistake of doing one coat, each eye, and when I went back to apply second coat it was kind of hard.
-Doesn't do so much for length

Go get you some!!
Tuesday, December 13, 2011
Monday, December 12, 2011
Tuesday, December 6, 2011
Monday, December 5, 2011
Sunday, November 27, 2011
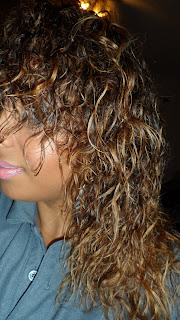
Blonde hair, Don't Care!!!


Soooo....I went blonde...err orange..or something lol. I knew I wanted to change it up sooooo this is what I did. I went from dark dark brown (with a light brown, red on bottom) to this!
PS. If your hair is damaged, then I would not recommend using bleaching products at this time. This process can be very damaging. I already knew before I colored my hair that I would be getting a drastic haircut afterward.
PPS. This was a huge change. I'm not sure how I feel about it just yet lol. If you have the money, go to a professional. I do not, so I did it myself.
Products Used:


Step One:
-I have curly hair, so I straightened it first for easier application
-Use the Revlon Frost & Glow Honey Highlighting Kit ($6.74 from Target). I have dark brown hair, so this was the kit for me. If your hair is lighter, they have other versions for lighter hair.
-I chose the full head application, but you can do face framing only, etc.
-The highlighting tool it comes with is a little crappy, so you may one to get your own.
-Shout out to my Dad for helping me use the highlighting cap and pull the strands through the back that I couldn't see! Lol
-I left it on for 45 minutes. This will vary depending on your hair. Keep checking it every 5 minutes or so. It will turn orange at first, but keep it on for it to go past that stage.
Step Two:
-Rinse, shampoo with Clairol Shimmer Lights for Blonde Hair ($8.29 at Sally Beauty/$7.49 for members), lightly condition, and rinse again
-Blow dry your hair. If you are satisfied with your color, then stop here! If your hair is still an orangy tint then follow the next step.
Step Three:
-Use the Revlon Colorsilk in Ultra Light Ash Blonde ($3.14 at Walmart and Target) all over your head. This will lift your base color to a light brown and the Ash color will cancel out the orangy blonde
-I left it on for 45 minutes per the directions
-While my hair was developing I prepared my deep conditioning hair mask which consist of half a ripe avocado, EVOO (1/2 cup), honey (1/4 cup), one egg (for protein..you can skip this) and I pureed it in a blender.
Step Four:
-Rinse, Shampoo with the Shimmer Lights again, lightly condition to detangle
Step Five:
-Freak out because your hair is blonde!
-Apply the deep conditioning treatment that you made above to your hair.
-Put a shower cap on and sit under a dryer or conditioning cap for 20 minutes.
Step Six:
-Rinse our your conditioning treatment and style your hair as normal
Maintenance:
-Since this was all damaging, you need to take special care of your hair. Regular hot oil or deep conditioning treatments are a must!!
-I will be using the Shimmer Lights shampoo regularly to tame some of the brassiness that I still have in my hair.
-I will also be getting a haircut to clean up any of the fried ends.
Good luck! Bleach at your own risk!!! I AM NOT a professional and have no clue what I am talking about lol

Friday, November 4, 2011
NOTD: Collide-o-Scope Xplosion


Nail of the Day: Collide-o-Scope xplosion!
On ring finger/big toe: Sally Hansen Salon Effects in Collide-o-scope
On fingers: Sinful Colors nail polish in Let's Meet
On toes: Sally Hansen Xtreme Wear in Blue Me Away!!
Ring: Forever 21
Have a great weekend!!
Wednesday, November 2, 2011


Tuesday, November 1, 2011
Check Me Out!
Follow me on Tumblr...
Why?
It's just easier!!!!
If you like a look, let me know and I can add a blog post about it...
Holler!
Subscribe to:
Posts (Atom)